 Flip it!
What About the Food Coloring?
Red velvet cake wouldn’t be red without food coloring. I recommend gel food coloring because the color is concentrated, so you need less of it. For natural coloring, use beet powder. If you don’t want to use food coloring, leave it out! The cake will have the same flavor and be a lovely shade of cocoa.
Baking pans
The batter is then split into two separate 8-inch baking pans to create two layers. We tried it with 9-inch pans and while the texture was good, the layers were a little too thin for our liking. Trim the dome on top away so the top layer sits better on the bottom layer. When trimming, you will feel how moist this cake really is! Try to save these pieces to decorate the cake with later!
HOW DO I STORE THIS?
Due to the cream cheese frosting, I recommend storing the red velvet cake in the fridge if you want to keep it longer than 2 days. Place the cake under a cake dome or lightly cover with plastic wrap. The cake keeps for 5 days. Before serving, bring the cake to room temperature.
CAN I FREEZE THIS CAKE?
Yes! You can freeze the assembled cake or individual slices. Wrap the cake or slices in a couple of layers of plastic before freezing for up to 3 months. Bring the cake to room temperature before you serve it.
Ingredients
Cake
2 cups (250 g) all-purpose flour
2 cups (400 g) granulated sugar
1 teaspoon baking soda
1 teaspoon baking powder
⅓ cup (39 g) unsweetened cocoa powder
1 teaspoon kosher salt
1 cup (232 g) mayonnaise, room temperature
2 large eggs, room temperature
1 cup (245 g) buttermilk, room temperature
2 teaspoons vanilla extract
1 ounce red food coloring, more or less depending on how deep you want the color
½ cup hot water
1 teaspoon white distilled vinegar
Cream Cheese Frosting
½ cup (1 stick / 113 g) salted butter, room temperature
8 ounces cream cheese, room temperature
1 teaspoon vanilla extract
4 cups (500 g) confectioners’ sugar
Instructions
Cake
Preheat oven to 325°F. Spray 2, 9-inch round cake pans with nonstick cooking spray and line each with parchment paper. Set aside.
In a large bowl, whisk together the flour, sugar, baking soda, baking powder, cocoa powder, and salt.
In a separate bowl, whisk together the mayonnaise, eggs, buttermilk, vanilla, red food coloring, hot water, and vinegar.
Slowly add the wet ingredients to the dry ingredients, mixing until just combined.
Divide the batter equally between the prepared pans. Bake for 35-40 minutes, or until a toothpick comes out mostly clean. A few crumbs are what you want for a MOIST cake!
Allow the cakes to cool for 10-15 minutes in the pans. Then, turn the cakes out onto a rack to cool completely. After the cakes have cooled completely, make the frosting.
Cream Cheese Frosting
To a large bowl, add the butter, cream cheese, and vanilla. Using a handheld mixer on medium speed, blend until the ingredients are fully incorporated and smooth.
Add confectioners’ sugar, one cup at a time, until the frosting is light and creamy.
Cover the cooled cake in a thin layer of frosting, putting it between the layers and around the outside of the cake. Serve.
Notes
Make Ahead Instructions: The cake layers can be baked, cooled, and covered tightly at room temperature overnight. Likewise, the frosting can be prepared then covered and refrigerated overnight. Let the frosting sit at room temperature to slightly soften for 10 minutes before assembling and frosting.
Cake Flour: For best texture and taste, I strongly recommend cake flour. You can find it in the baking aisle and I have many more recipes using it. If you can’t get your hands on cake flour, you can make a DIY cake flour substitute.
Vinegar: The vinegar helps brighten the red color. Don’t get scared, a touch of vinegar is normal in red velvet desserts! You can’t taste it.
Why is everything at room temperature? When everything is near the same temperature, they mix together easily, evenly, and produce a uniform texture. It’s important!
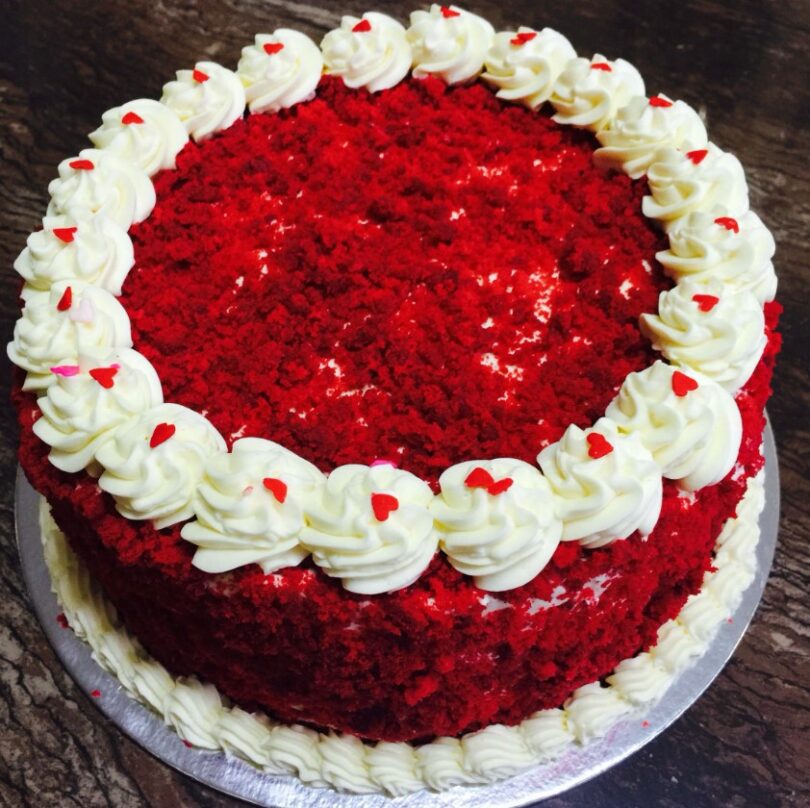
Food Coloring: The amount of red food coloring is up to you. I tested with varying amounts. To get the dark red color you see here, use 2 teaspoons of gel food coloring. You could use liquid food coloring too, but gel food coloring is more potent. You’ll need at least 1 Tablespoon of liquid. Dye the batter until you are pleased with the color. Use beet powder for a natural alternative (mix it with 2 teaspoons of water before adding) or leave the food coloring out completely.
Buttermilk: Buttermilk is a key ingredient and flavor in this recipe. You can use low fat or full fat. If you don’t have buttermilk, you can make your own sour milk. To do so, add 1 and 1/2 teaspoons of fresh lemon juice or white vinegar to a liquid measuring cup. Add enough regular milk (whole milk is best) to make 1 cup. Stir the two together, then let it sit for 5 minutes before using.
Sheet Cake: This batter fits nicely into a 9×13 inch cake pan or 12×17 inch sheet pan. Same oven temperature. Bake for about 40-45 minutes or 20-25 minutes, respectively. Keep your eye on the cake and use a toothpick to test for doneness.
3 Layer Cake: Prepare 3 9-inch cake pans in step 1 and divide the batter evenly between the pans. Bake for about 22-25 minutes.
Bundt Cake: This cake batter fits into a 10-cup or larger bundt pan. I’m unsure of the exact bake time (likely around an hour), but use a toothpick to test for doneness. Same oven temperature.
Cupcakes: You can use this cake batter for 2-3 dozen cupcakes. Fill cupcake liners 1/2 – 2/3 of the way full. Bake for 20-21 minutes or until the tops of the cupcakes spring back when gently touched and a toothpick inserted in the center comes out clean. Use my red velvet cupcakes recipe if you need fewer.
Adapted from Iambaker