 Flip it!
TOP Reviews:
Using this for teacher gifts. Was planning on using my favorite recipe from the Fanny Farmer Baking Book for the bread, but noticed that the ingredients were almost identical so I used this one instead. I omitted the cloves (don’t like them much) and after reading from another reviewer that the bread had tasted a little too spicy. Cut back a little on the cinnamon too. I also used cooking spray to grease the inside of the jars. After filling half-full I placed the jars directly on the rack (as another person suggested). They came out perfect and the recipe is delicious! If when taking them out of the oven you noticed that they’ve popped out of the jar a little you can carefully (with gloves of course) press the top of the bread down gently so that the sides are away from the seal. I made sure that the rim was clean and even with them being quite full they all sealed perfectly. Found the pint-size wide mouth jars by where I live for only 5.99 for a dozen at Big Lots. Plan on decorating them with 7″ round pieces of material with ribbons and will print out gift tags to attach with a note to heat for less than 30 seconds in the microwave so they will slide right out and be ready for slicing. Will definitely make them again, plan on buying more mason jars and storing them for holiday baking! Hope this review helps…all the others did for me as well!
I’ve made these 5 times! Very moist but the real key is to NOT bake them on a baking sheet. Carefully put the jars directly on the oven rack for more even baking. Baking on the sheet causes the middle to be not cooked with the top being too cooked! I got so many compliments from everyone I gave these as a gift to!
I just made these with 8 ounce Jelly jars and they turned out perfect filling with 1/2 cup of batter. I will put these jars in inexpensive mugs with a packet of hot cocoa mix. wrap with cellophane and ribbon for a cute little gift. Thanks for the recipe and gift idea!!!
Fantastic!! This was my first time making banana bread and it turned out wonderful. My husband, who is a banana bread conniseur, said it was the best he’s ever had. I found the jars at Wal-Mart, since I know a few of you were having trouble finding them. I also reduced the cloves from 1 1/2 tsp to 1 tsp. Like another reviewer, I scaled the recipe to make 12 jars. As an experiment, I cooked 6 jars at a time, the first time with a cookie sheet, the second time without. The bread cooked with the cookie sheet turned out just fine, however, the ones cooked without the sheet look more golden brown on the outside (the others were darker). Also, HELPFUL HINT!!, I figured out a super easy way to get the batter into the jars: pour the batter into a heavy gallon freezer bag and cut a small hole in the corner of the bag. This way, you can pipe the batter right into the jars. No mess! Thanks, this recipe is great. Can’t wait for gift-giving this year! Next time I’ll try pumpkin.
Very, very impressed with this method. Used the recipe “pumpkin bread” from this website and made two jars as an experiment and two loaves with the batter. In heaven from eating some still warm slides after dinner! It was very easy to pipe batter into the jar with a gallon size bag with a hole cut in the corner. I used 1 cup of batter in each jar and it cooked perfectly up to the top without going over in about 45 minutes. After about 10 minutes being sealed I heard the “ping/pop” noise that it’s supposed to make. Haven’t tried getting it out of the jars yet, but it doesn’t look like it’ll be a problem. What a fun idea, thank you! I will definitely make the banana bread and give these out for the holidays.
This bread was very good. I will be taking it to a party in a couple of days, but I had to try one for myself, first. One problem that I encountered was that not all of them cooked all the way, due to where they were situated in the oven. Next time I’ll make certain to rotate them at the half way point. Aside from that, they were very good and easy to make!
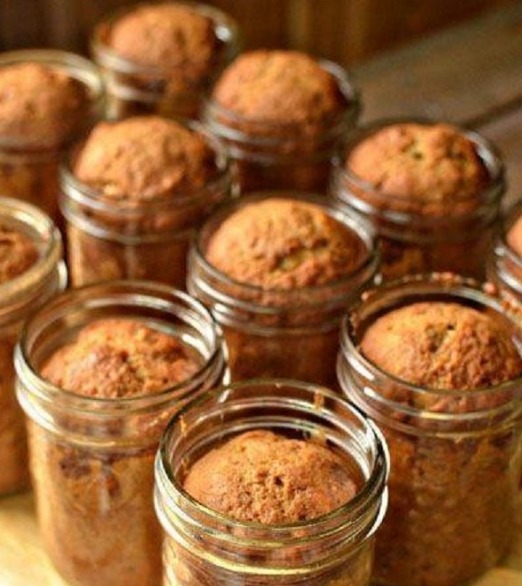
Banana Bread In a Jar Ingredients:
2/3 cup shortening
2 2/3 cups white sugar
4 eggs
2 cups mashed bananas
2/3 cup water
3 1/3 cups all-purpose flour
1/2 teaspoon baking powder
2 teaspoons baking soda
1 1/2 teaspoons salt
1 teaspoon ground cinnamon
1 teaspoon ground cloves (I used half a teaspoon because I didn’t want mine too ‘clovey’.)
2/3 cup chopped pecans or walnuts
You will also need:
12 250 ml canning jars – sterilized
funnel
Directions:
Preheat oven to 325 degrees F (165 degrees C). Grease insides of a dozen 250ml canning jars. (I wiped mine down with vegetable oil.)
In a large bowl, cream shortening and sugar until light and fluffy. Mash bananas–Beat in eggs, bananas, and water.
Sift together flour, baking powder, soda, salt, cinnamon, and cloves.
Add to banana mixture and mix well.
Add nuts and stir them in with spoon.
Insert canning funnel into mouth of jar and pour mixture into greased jars, filling half full. Do NOT put lids on jars for baking. Be careful to keep the rims clean, wiping off any batter that gets on the rims.
Place jars directly on rack in oven. Bake for 45 minutes. Don’t worry if a few rise over the top of the jar a bit. You can press it down with the lid after it has finished baking.
While jars are still warm, add lids. Screw on tightly.
Listen for the ping once you have added the lids; this means that the jar is sealed. If you miss the “ping”, wait until they are completely cool and press on the top of the lid. If it doesn’t move at all, it’s sealed.
From: 1krecipes.com