 Flip it!
In celebrating the timeless joy of peanut butter cookies, let the warmth and familiar aroma of these treats continue to create cherished moments for years to come.
Highlight the enduring charm of peanut butter cookies, a timeless favorite that transcends generations.
Capture the essence of their soft, crumbly texture, evoking cherished and nostalgic memories.
Explore their roots in early 20th-century America, acknowledging their persistent popularity in households worldwide, thanks to their rich peanut butter flavor and satisfying consistency.
The Pleasure of Pairing Peanut Butter Cookies:
Recommend savoring these delightful cookies with a glass of milk for a comforting snack or alongside a scoop of vanilla ice cream for a decadent treat.
Introduce inventive serving suggestions, such as sandwiching them with Nutella or peanut butter icing, providing a delightful twist to the classic cookie experience.
Encourage readers to embrace the versatility of these cookies, promising a delightful journey with each and every bite.
Storage:
To preserve the freshness of your peanut butter cookies, store them in an airtight container at room temperature for up to one week. For extended freshness, consider freezing the cookies. Place them in a single layer on a baking sheet in the freezer until solid, then transfer them to a sealed container or zip-top bag. They can be stored in the freezer for up to three months. Thaw frozen cookies at room temperature before serving.
Variations:
- Chocolate Chip Delight: Add a cup of chocolate chips to the cookie dough for a delightful blend of peanut butter and chocolate.
- Nutty Crunch: Incorporate chopped nuts, such as walnuts or pecans, into the dough to add a satisfying crunch to each bite.
- Oatmeal Twist: Mix in a cup of old-fashioned oats to create a heartier texture and enhance the cookie’s overall flavor.
- Fruity Fusion: Include a half cup of dried fruit, such as raisins or cranberries, for a sweet and tangy twist.
- Flavor Infusion: Experiment with flavored peanut butter, such as honey or chocolate-infused, to add an extra layer of taste.
Tips:
- Soft and Chewy: To maintain softness, slightly underbake the cookies, removing them from the oven when the edges are just set but the centers are still slightly soft.
- Uniform Size: For evenly baked cookies, ensure that each portion of dough is the same size and shape. This ensures consistent baking results.
- Flour Measurement: Spoon the flour into the measuring cup and level it off with a knife to avoid overpacking and creating a dry cookie.
- Room Temperature Ingredients: Bringing ingredients like eggs and peanut butter to room temperature allows for better mixing and a more uniform cookie texture.
- Customization: Personalize your cookies by rolling the dough balls in sugar or sprinkling them with a touch of sea salt before baking for an extra layer of flavor.
With these storage tips, versatile variations, helpful notes, and valuable tips, you’re equipped to create, store, and enjoy these peanut butter cookies in various delightful ways.
You may also like:
[visual-link-preview encoded=”eyJ0eXBlIjoiaW50ZXJuYWwiLCJwb3N0IjoxMTQ5OCwicG9zdF9sYWJlbCI6IlBvc3QgMTE0OTggLSBDQUtFIE1JWCBQRUFOVVQgQlVUVEVSIENPT0tJRVMiLCJ1cmwiOiIiLCJpbWFnZV9pZCI6MTE0OTksImltYWdlX3VybCI6Imh0dHBzOi8vMDFlYXN5bGlmZS5jb20vd3AtY29udGVudC91cGxvYWRzLzIwMjIvMDUvQ0FLRS1NSVgtUEVBTlVULUJVVFRFUi1DT09LSUVTLmpwZyIsInRpdGxlIjoiQ0FLRSBNSVggUEVBTlVUIEJVVFRFUiBDT09LSUVTIiwic3VtbWFyeSI6IkluIGEgbGFyZ2UgYm93bCwgbWl4IHRvZ2V0aGVyIHRoZSBwZWFudXQgYnV0dGVyLCBlZ2dzIGFuZCBvaWwgdW50aWwgd2VsbCBjb21iaW5lZC4gU2xvd2x5IGFkZCB0aGUgY29udGVudHMgb2YgdGhlIGRyeSBjYWtlIG1peCB0byB0aGUgYmF0dGVyIGFuZCBtaXggd2VsbCB1bnRpbCB5b3UgZ2V0IGEgdGhpY2sgY29va2llIGRvdWdoLiBVc2UgeW91ciBoYW5kcyB0byBtYWtlIGFib3V0IDE1IGV2ZW4gYmFsbHMgb2YgZG91Z2g7IGxpbmUgdGhlbSB1cCBvbiB5b3VyIGJha2luZyBzaGVldC4gUHJlc3MgYSBmb3JrIGludG8gZWFjaCBkb3VnaCBiYWxsIHRvIGZvcm0gYSDigJxjcm9zcyBoYXRjaOKAnSBkZXNpZ24uIFsmaGVsbGlwO10iLCJ0ZW1wbGF0ZSI6InVzZV9kZWZhdWx0X2Zyb21fc2V0dGluZ3MifQ==”]
What you’ll need for Peanut Butter Cookies:
- 3 cups of all-purpose flour
- 3 room-temperature eggs
- 1 cup of creamy peanut butter
- 1 cup of shortening
- 1 cup of firmly packed brown sugar
- 1 cup of granulated sugar
- 2 teaspoons of baking soda
- 1/4 teaspoon of salt
How to make the Peanut Butter Cookies:
- Begin by preheating your oven to 375°F (190°C) and prepare baking sheets with parchment paper.
- In a large bowl, blend the shortening, peanut butter, and both sugars until achieving a smooth and creamy consistency.
- Gradually add the eggs, beating well after each addition for a seamless blend.
- In a separate bowl, mix the flour, baking soda, and salt together.
- Slowly incorporate the dry mixture into the creamy blend, stirring to form a consistent cookie dough.
- Spoon out rounded tablespoons of dough onto your prepared baking sheets, leaving ample space between each.
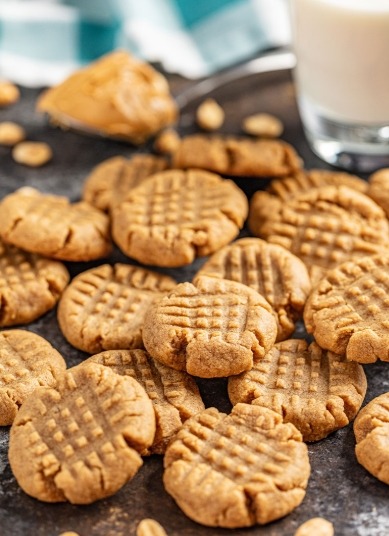
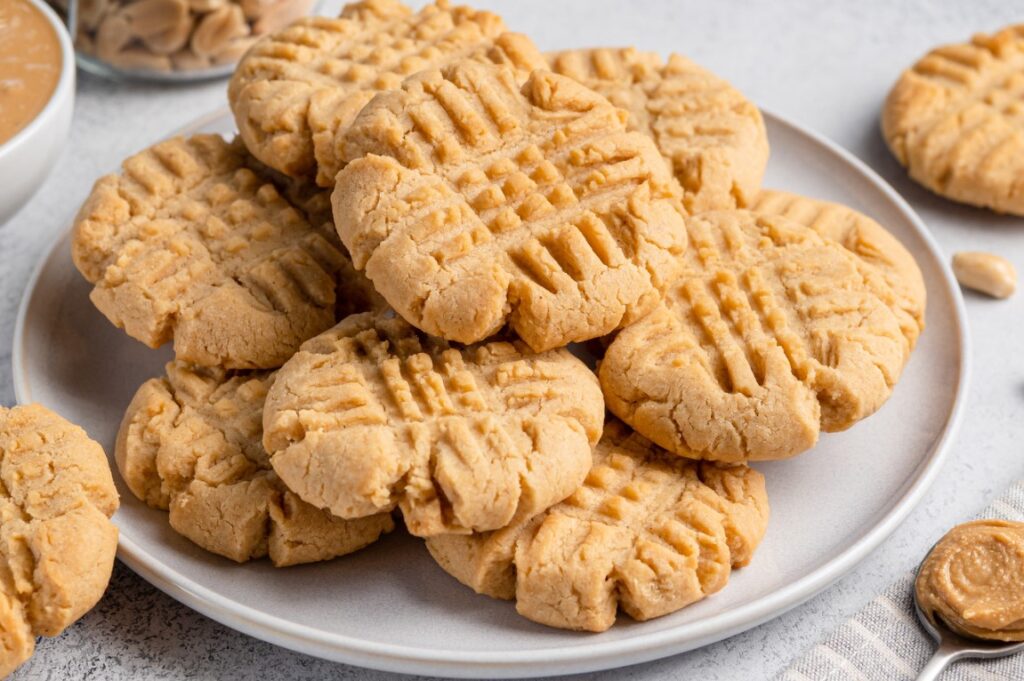
- Press a fork across each dough ball, creating the classic crisscross pattern and slightly flattening them.
- Bake for 10-12 minutes or until the edges exhibit a light golden hue.
- Allow the cookies to cool briefly on the sheets before transferring them to racks for complete cooling.
Notes:
- Ensure the eggs are at room temperature for a smoother incorporation into the cookie dough.
- Adjust the baking time according to your oven and desired cookie texture. A shorter baking time results in a softer cookie, while a longer duration produces a crispier texture.
- Be cautious not to overmix the dough to prevent a dense cookie. Mix until just combined for a light and tender result.
- For a uniform cookie size, use a cookie scoop or measure the dough consistently with a tablespoon.
- The classic fork pattern not only adds a decorative touch but also aids in even baking by flattening the cookies.